Configure Extended Protection in Exchange Server
https://www.alitajran.com/extended-protection-exchange-server/
Configure Extended Protection in Exchange Server
Many environments have not yet enabled Extended Protection in Exchange Server. While it’s possible for them to enable Extended Protection, they are not aware or informed correctly that they should enable it for security reasons. In this article, you will learn how to configure Extended Protection in Exchange Server.
Table of contents
What is Extended Protection?
Windows Extended Protection enhances the existing authentication in Windows Server and mitigates authentication relay or “man in the middle” (MitM) attacks. This mitigation is accomplished by using security information that is implemented through Channel-binding information specified through a Channel Binding Token (CBT), which is primarily used for SSL connections.
While Extended Protection can be enabled manually on each virtual directory, Microsoft provided the ExchangeExtendedProtectionManagement.ps1 PowerShell script to help accomplish this in bulk.
There are some limitations to be aware of before enabling Extended Protection on Exchange Server. Therefore, you must review the Microsoft documentation (which is kept up to date) and check if you are eligible.
Windows Extended Protection is supported on the below Exchange Server versions:
- Exchange Server 2013
- Exchange Server 2016
- Exchange Server 2019
Note: You need the August 2022 Exchange Server Security Update (SU) release or later installed on the Exchange Server.
Important: Remember to keep the Exchange Server up to date with the latest Exchange Cumulative Update and Exchange Security Update. Subscribe to the newsletter, and don’t miss out on the Exchange Server updates.
Check Extended Protection status
We recommend two methods to check the Extended Protection status on Exchange Server.
Method 1. Exchange Health Checker script
Run the Exchange Health Checker script and create an Exchange Server Health Check report. This will tell you if Extended Protection is enabled on the Exchange Server.
Extended Protection is not enabled on the Exchange Server, and it shows the security vulnerabilities:

Method 2. Exchange Extended Protection Management PowerShell script
Download ExchangeExtendedProtectionManagement.ps1 PowerShell script and save it in the C:\scripts folder.
Run Exchange Management Shell as administrator and run the script, including the -ShowExtendedProtection parameter.
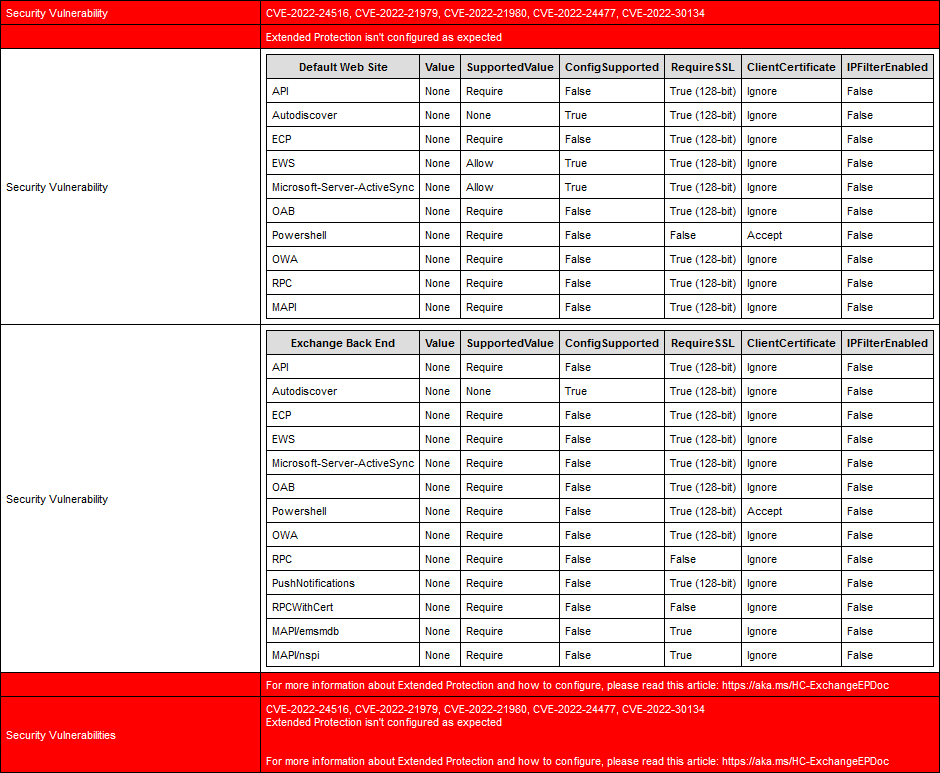
The Value and SupportedValue column should be the same values.
In our example, the Value column shows None for all the virtual directories, which means that Extended Protection is not enabled on the Exchange Server.
In the next step, we will enable Extended Protection on the Exchange Server.
How to enable Exchange Server Extended Protection
Go through the below steps to enable Extended Protection on the Exchange Server.
Important: Do the steps after working hours, even with a DAG configuration. That’s because you need to ensure that Outlook clients can connect successfully after the change.
1. Update to the latest Exchange Server CU/SU.
2. Configure Exchange Server TLS settings.
3. Disable SSL Offloading for Outlook Anywhere.
SSL offloading for Outlook Anywhere is enabled by default and must be disabled for Extended Protection.
4. Download ExchangeExtendedProtectionManagement.ps1 PowerShell script and save it in the C:\scripts folder.
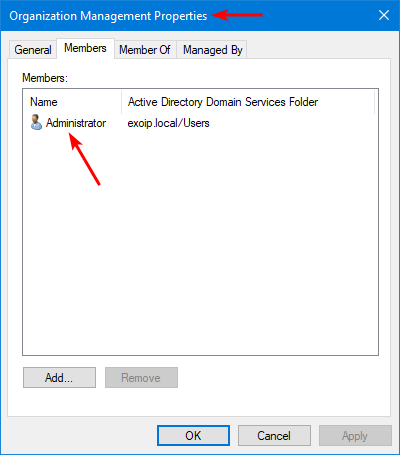
5. Ensure that the admin is added to the Organization Management group.

Note: The user must be in Organization Management and must run this script from an elevated Exchange Management Shell (EMS) command prompt. After adding the user to the Organization Management group, sign off and sign in again to have the changes take effect.
6. Change the path directory to the scripts folder and run the PowerShell script to enable Extended Protection on Exchange Server.
7. The output will show information about enabling Extended Protection. Press Y and Enter.
8. The script will process the prerequisites tasks, create a backup for applicationHost.config, and configure Extended Protection.
Extended Protection is successfully enabled.
Verify Extended Protection enabled status
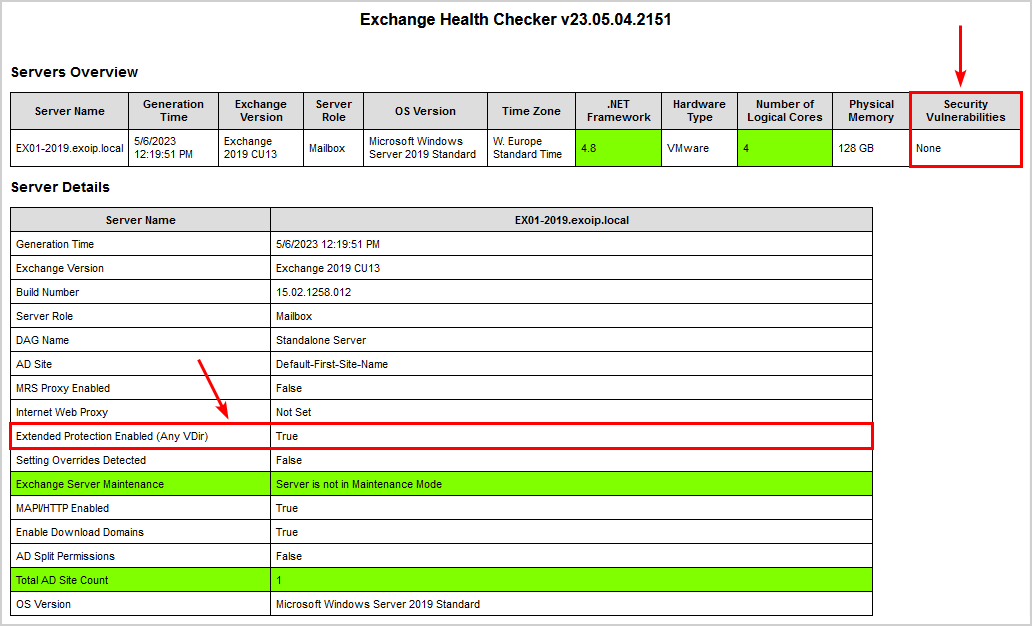
Ensure everything is set correctly and create a new Exchange Server Health Check report.
There are no more Security vulnerabilities for Extended Protection. It shows Extended Protection Enabled (Any VDir) with the value True.

Another way is to check it with the PowerShell script. This is how it looks.
The Value and SupportedValue column shows the same values. This means that Extended Protection is enabled on the Exchange Server.
Extended Protection is successfully configured on the Exchange Server.
Rollback Exchange Extended Protection
This syntax rolls back the Extended Protection configuration for all the Exchange Servers that are online where Extended Protection was previously configured.
This syntax rolls back the Extended Protection mitigation of IP restriction for the EWS Backend virtual directory of all the Exchange Server that are online where Extended Protection was previously configured.
That’s it!
Read more: Enable PowerShell serialization payload signing in Exchange Server »
Conclusion
You learned how to configure Extended Protection in Exchange Server. First, ensure that the prerequisites are met. Next, run the PowerShell script. The script will tell you if there is a missing configuration and will abort. If everything looks good, it will enable Extended Protection on all the virtual directories. Suppose you have issues, it’s easy to revert the Extended Protection changes with the PowerShell script.
Did you enjoy this article? You may also like Limit access to/from port 25 on Exchange Server. Don’t forget to follow us and share this article.

Комментарии
Отправить комментарий